How to Set Up Dual Monitors on a Laptop (UK Guide)
From "what ports do I even have?" to a working, comfortable two- or three-screen setup. The right cable, when you actually need a dock, the exact Windows 11 and macOS settings, and a proper troubleshooting section - written for UK home and office workers.
 By Dan Coveney · Founder & Lead Reviewer · Updated July 01, 2026
1. The short version: how this actually works
A typical UK desk setup: laptop on a stand beside a single large external monitor, connected over USB-C.
Before the detail, here's the whole process in one breath. Setting up dual monitors on a laptop is four steps: work out what video output your laptop has; get the right cable (or, if you're short of ports, a dock); plug the monitor in; then tell the operating system to extend rather than duplicate the display and tidy up the arrangement, scaling and refresh rate. That's it. For most people in 2026 it really is one cable - a single USB-C lead from the laptop to a modern monitor - and ten minutes in Settings.
The reason it sometimes feels harder is the connectors. Laptops have shed their full-size HDMI and DisplayPort sockets for slim USB-C ports, and not every USB-C port can drive a screen. So the single most useful thing you can do is identify your ports correctly up front - that one check determines whether you need a £6 cable or a £150 dock.
What you'll need
A laptop with a working video output (almost all have one); an external monitor; the correct cable or adapter for the ports at each end; and, if your laptop has fewer or weaker ports than you need, a dock. No software to install in most cases - Windows 11 and macOS handle a single extra screen natively. The only common exception is DisplayLink, which we cover in section 5.
A quick word on terminology
You'll see three display modes throughout. Extend treats the external monitor as extra desktop space - the setup you almost always want. Duplicate (or "mirror") shows the same picture on both, useful only for presentations. Second screen only turns the laptop's own panel off and uses the external alone, which is how you run a laptop "closed-lid" on a desk.
2. Step 1: Work out your laptop's video outputs
This is the step that saves you money and frustration, so do it properly. Turn the laptop on its side and look at every port. For each one you're answering a single question: can this carry a video signal to a monitor? Here are the connectors you'll meet, easiest first.
Full-size HDMI
If your laptop has a full-size HDMI socket (the flat trapezoid shape), you're in luck - it's the simplest route there is. An HDMI port always carries video, so a single HDMI-to-HDMI cable from laptop to monitor is all you need. Most laptops with HDMI output HDMI 2.0 or 2.1, which is ample for a 1080p, 1440p or 4K monitor at 60Hz, and 2.1 ports will push 4K at 120Hz or higher. This is the one connector that needs no investigation.
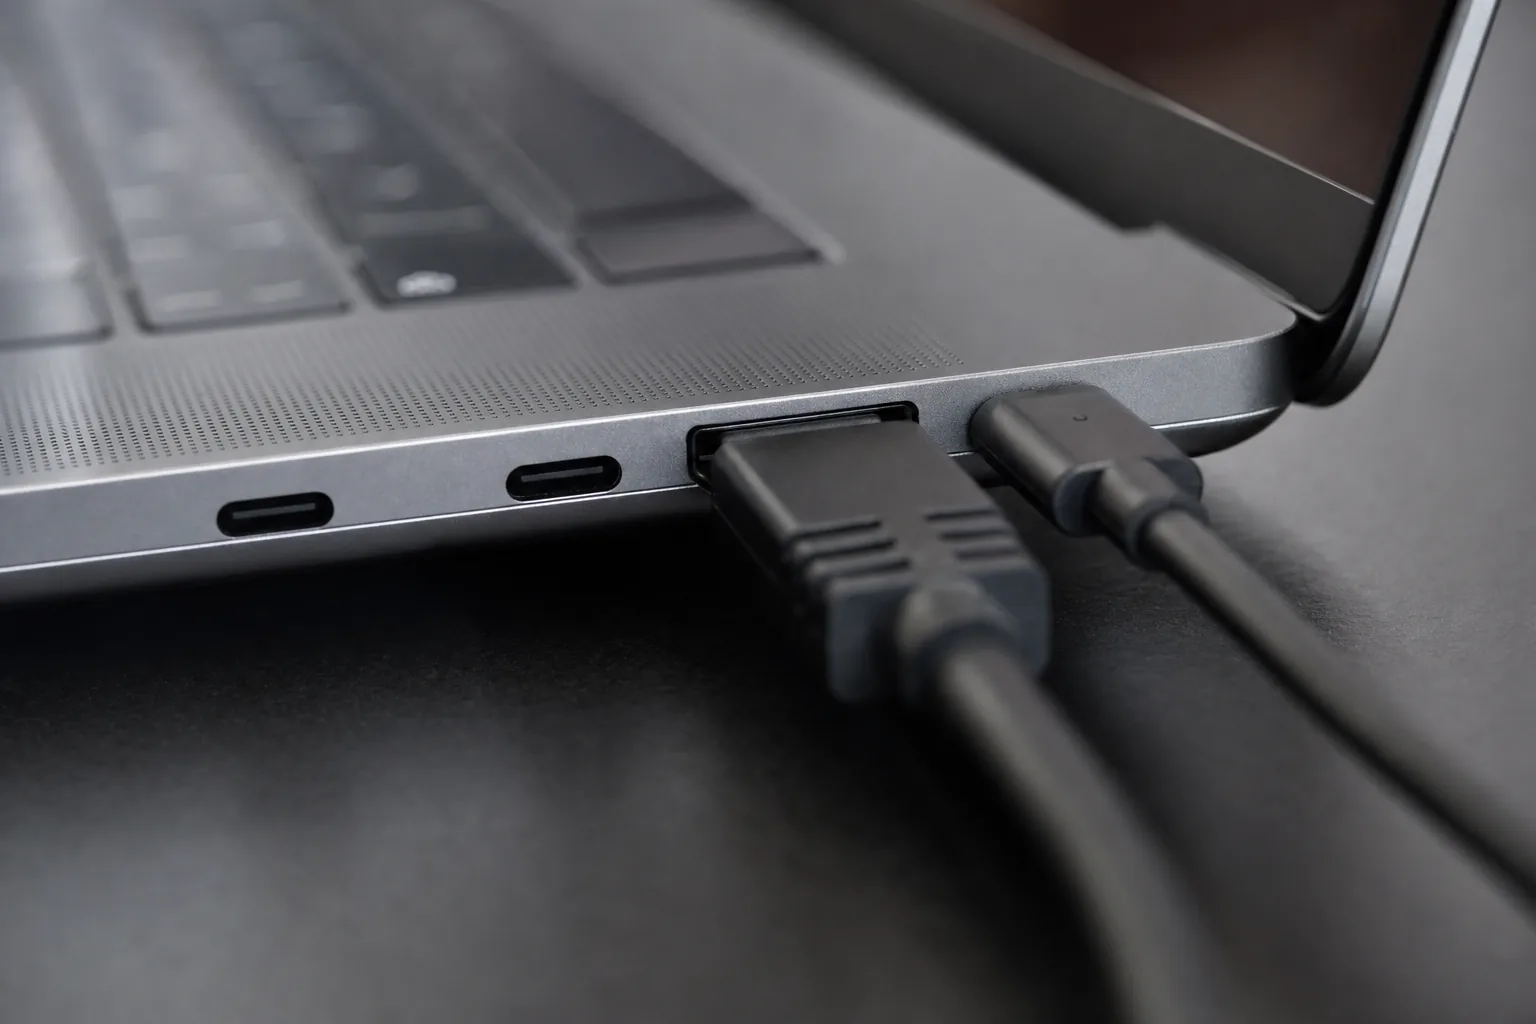
USB-C (the one that needs checking)
This is where most modern laptops live, and where the confusion starts. A USB-C port is just a shape - what it can do varies enormously. Some USB-C ports carry only power and data and will never drive a monitor; others carry video via a feature called DisplayPort Alt Mode (often written "DP Alt Mode"). You cannot tell by looking at the port shape alone. Look instead for a tiny icon printed or embossed next to the socket:
- A small "D"-shaped DisplayPort logo or the letters DP next to a USB-C port means it carries video. This is the green light you're looking for.
- A lightning-bolt Thunderbolt symbol next to a USB-C port means it's a Thunderbolt 3, 4 or 5 port - and Thunderbolt always carries video (more on that below). Another green light.
- A plain USB-C port with no markings, or just a battery or "SS" (SuperSpeed) symbol, may or may not support video. Don't assume - check the spec.
If the markings don't make it obvious, find your laptop's exact model number (on a sticker on the base, or in Windows under Settings > System > About) and search the manufacturer's spec page for "DisplayPort Alt Mode" or "video out". Five minutes with the spec sheet beats buying a charge-only cable.
Thunderbolt 3, 4 and 5
Thunderbolt uses the USB-C connector but is a higher-end standard that bundles video, fast data and power down one cable. If your port has the lightning-bolt symbol, it will absolutely drive a monitor - usually two of them through a single Thunderbolt dock. Thunderbolt 4 guarantees enough bandwidth for two 4K displays; Thunderbolt 5, now appearing on premium 2026 laptops, roughly triples that headroom. For dual or triple monitors, a Thunderbolt port is the best output you can have.
Mini DisplayPort and full-size DisplayPort
Less common on laptops now, but some workstation and gaming machines still carry a full-size DisplayPort or the smaller Mini DisplayPort socket (a squarer shape than HDMI, with two notched corners). Both carry video reliably and feed straight into a monitor's DisplayPort input with the matching cable. DisplayPort is, if anything, slightly better than HDMI for high refresh rates and daisy-chaining, so it's a welcome sight.
The "USB-C but no video" trap
The most common failure we see is plugging into a USB-C port that only does power and data, then blaming the cable or monitor. If a USB-C connection gives you nothing on screen, the first thing to test is another USB-C port on the same laptop - manufacturers often wire only one or two for video. If you have a Thunderbolt-marked port, use that one.
3. Step 2: Check what inputs your monitor has
Now flip your attention to the monitor. The laptop's port has to meet a matching port on the screen, so check what the monitor offers before you buy a cable. Modern monitors almost always have at least one HDMI input, very often a DisplayPort input, and increasingly a USB-C input too. The job is to pair the best output on the laptop with a compatible input on the monitor.
The ideal: USB-C monitor + USB-C laptop
If both your laptop and monitor have a video-capable USB-C port, this is the cleanest possible setup. One USB-C cable carries the picture and, on many monitors, delivers power to charge the laptop and acts as a USB hub for your keyboard, mouse and webcam. A single cable to plug in each morning does everything - this is what "one cable" docking really means, and it's why USB-C monitors are worth the small premium for desk use. Check the spec lists "USB-C with Power Delivery" and note the wattage (65W charges most ultrabooks; 90W or more for larger laptops).
The common case: HDMI or DisplayPort
If your monitor's only convenient input is HDMI or DisplayPort, match it to the laptop. Laptop HDMI to monitor HDMI is the no-brainer. If the laptop only has USB-C (DP Alt Mode) but the monitor only has HDMI or DisplayPort, you need a USB-C to HDMI or USB-C to DisplayPort cable - a single lead with USB-C on one end and the monitor's input on the other. These are cheap and reliable as long as the laptop's USB-C port supports DP Alt Mode (exactly why step 1 matters).
Resolution and refresh rate sanity check
Match the cable to what you want to run. For a 1080p or 1440p monitor at 60Hz, almost any decent cable will do. For 4K at 60Hz, use an HDMI 2.0-or-better or DisplayPort 1.4-or-better cable. For 4K at 120Hz or a high-refresh gaming panel, you want HDMI 2.1 or DisplayPort 1.4/2.1 at both ends - and the laptop's port has to support that bandwidth too. A common disappointment is a 4K monitor stuck at 30Hz: that's the tell-tale sign of a cable, port or adapter that can't carry full 4K/60, and the fix is better hardware in the chain, not a settings tweak.
4. Step 3: Cables and adapters, demystified
Cables are where a fiver saved becomes an afternoon lost. The golden rule: buy a cable that explicitly states it carries video. Many USB-C cables - even the expensive ones bundled with phones - are built for charging and basic data only, and will silently fail to drive a screen with no error to explain why.
What to look for when buying
- USB-C to USB-C for a USB-C monitor: choose a cable rated for "USB4", "Thunderbolt", or one that explicitly lists "DisplayPort Alt Mode" / "video". If you also want it to charge the laptop, check the power rating (e.g. "100W PD").
- USB-C to HDMI / USB-C to DisplayPort: these are single-purpose adapters and cables; just match the resolution and refresh rate you need (look for "4K 60Hz" on the listing if that's your target).
- HDMI to HDMI: a "High Speed" cable handles 4K/30 and 1080p/60 fine; an "Ultra High Speed" (HDMI 2.1) cable is what you want for 4K/120 or 8K. There's no need to overspend on exotic brands for normal desk distances.
- DisplayPort to DisplayPort: look for "DP 1.4" or "DP 2.1" for high resolutions and refresh rates.
Adapters and dongles: fine, with caveats
A small USB-C-to-HDMI dongle is perfectly good for a single monitor and travels well. The caveats are quality (cheap unbranded adapters drop signal or limit you to 4K/30) and the fact that a passive adapter can only convert a signal that's already there. If the USB-C port doesn't do DP Alt Mode, no passive adapter will conjure video out of it; you'd need an active solution, which is effectively a dock.
Cable length matters more than you think
For USB-C, Thunderbolt and high-refresh HDMI/DisplayPort, keep passive cables to around 1.5-2 metres. Longer runs at high bandwidth start dropping signal - flicker, black-outs or a refusal to reach full resolution. If you genuinely need a long run, buy an "active" or "optical" cable rated for the distance rather than a cheap long passive one.
For a related buying decision, our guide to the best monitors for working from home covers panel sizes and resolutions worth pairing with a laptop, and there's more on getting a sharp picture in our piece on 4K versus 1440p.
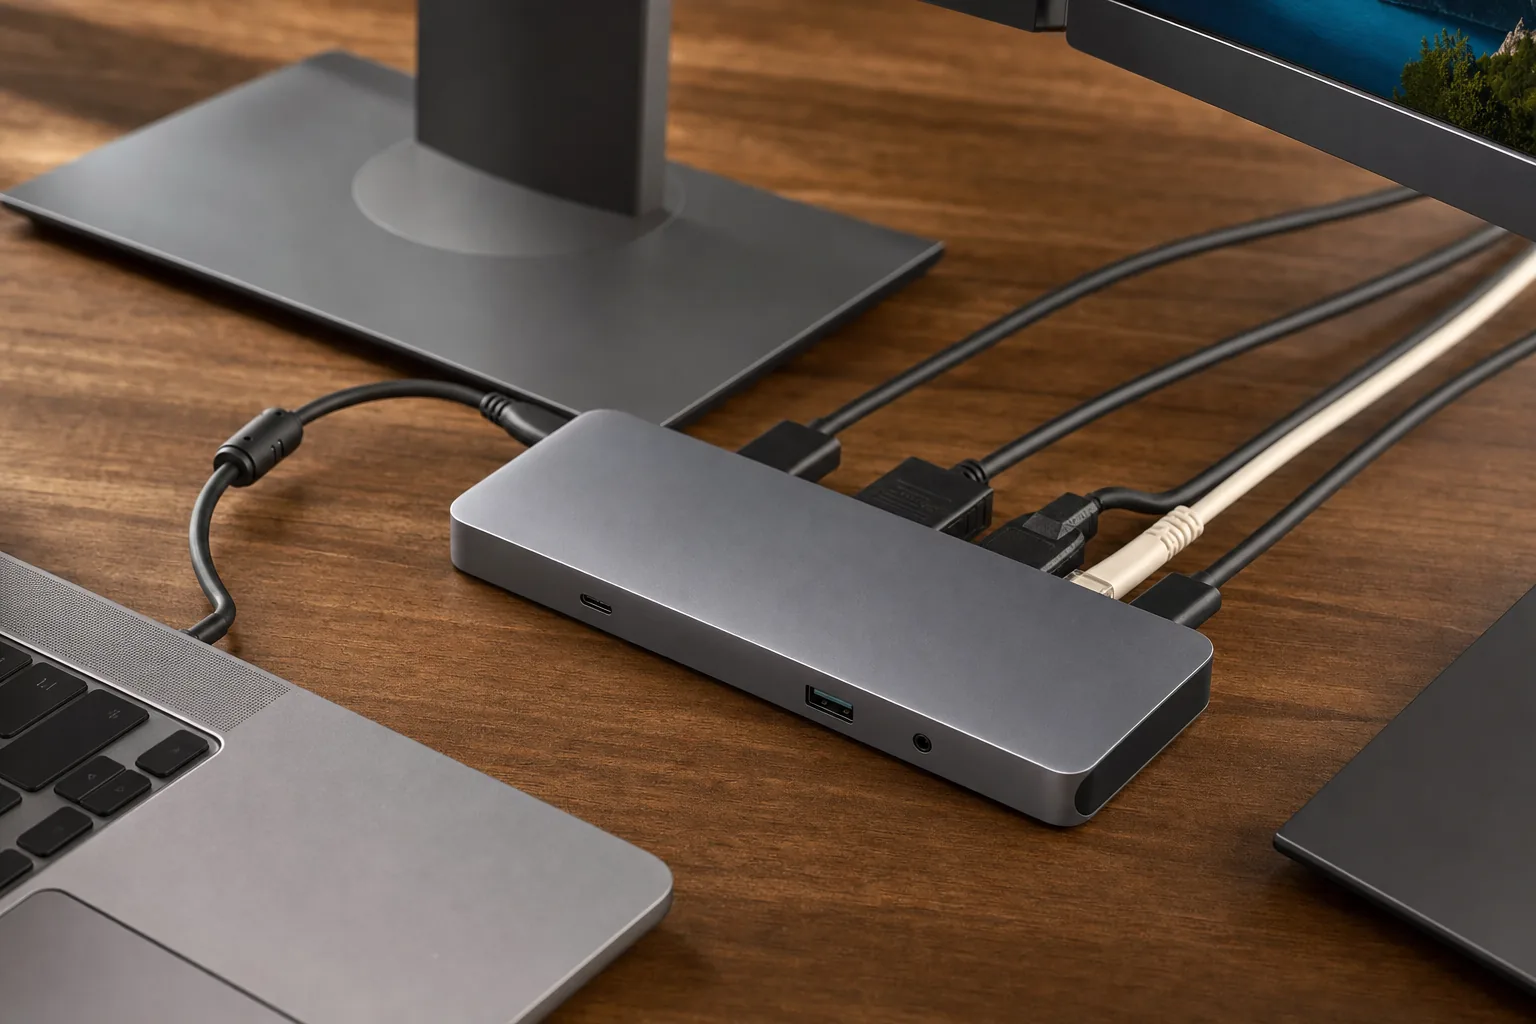
5. When you need a dock or DisplayLink (and its limits)
A single cable handles one external monitor beautifully. You start needing a dock when you run out of ports, want one-cable docking with charging, or - most importantly - want more than one external screen from a laptop that can only natively drive one. A dock is a hub: one cable into the laptop, fanned out into multiple video outputs, USB ports, Ethernet and power.
Two kinds of dock - and they're very different
There are two technologies behind multi-monitor docks, and the difference decides what you can do.
- Thunderbolt / USB-C (native video) docks. These pass your laptop's real DisplayPort signal through to the monitors. They give the best performance - full resolution, full refresh rate, no extra software, and full support for protected video like Netflix. The catch is that they only work as multi-monitor docks if your laptop's port has the bandwidth: a Thunderbolt laptop can typically run two monitors through a Thunderbolt dock, but a basic USB-C (DP Alt Mode) port can usually only carry one display no matter how many ports the dock has.
- DisplayLink docks. These use a clever workaround: software on the laptop compresses the screen image and sends it as USB data, which a chip in the dock turns back into a video signal. This lets you add multiple monitors even to laptops that natively support only one - including older Apple Silicon MacBooks. DisplayLink is genuinely useful, but it has real trade-offs.
The honest limits of DisplayLink
DisplayLink is a brilliant get-out-of-jail card, but be clear-eyed about the compromises before you rely on it:
- You must install a driver (the DisplayLink Manager) and keep it running. No driver, no picture on the DisplayLink outputs.
- It uses CPU and a little battery because the laptop compresses video in software. On modern machines the load is modest for office work, but it's not free, and fast on-screen motion (gaming, smooth video) can look slightly less crisp than a native connection.
- Protected (HDCP) content is the big one. On macOS, DisplayLink requires the Screen Recording permission, and enabling it disables HDCP system-wide - so streaming services such as Netflix, Disney+ and Apple TV refuse to play or show a black box on every display, not just the DisplayLink one. If protected streaming on your desk matters, a DisplayLink dock on a Mac is the wrong choice.
Rule of thumb for docks
Want one extra monitor and have a video-capable USB-C port? You don't need a dock - just a cable. Want two-plus monitors and have Thunderbolt? Buy a Thunderbolt dock for native quality. Want two-plus monitors but your laptop only natively supports one (common on entry-level and older Apple Silicon machines)? A DisplayLink dock is your route, accepting the streaming and software caveats above.
Whichever you choose, plug the dock's power supply in first, connect the monitors to the dock, then connect the single cable to the laptop last - it makes the whole chain come up cleanly.
6. Step 4 (Windows 11): the display settings that matter
Windows 11's Display settings, showing the two numbered screen thumbnails you drag to match your real-world layout.
Plug the monitor in and Windows 11 usually shows something on it within a few seconds - but by default it may mirror your laptop screen, which isn't what you want. Here's how to set it up properly. Everything lives in one place: right-click the desktop and choose Display settings, or go to Settings > System > Display.
Extend, don't duplicate
At the top of Display settings you'll see two numbered rectangles for your screens, and a drop-down (just under the diagram) offering Duplicate these displays, Extend these displays, Show only on 1 and Show only on 2. Choose Extend these displays. Your desktop now spans both screens and you can drag windows between them. The fast shortcut for this menu is Windows key + P, which pops up a Project panel with the same four options - handy when you dock and undock often.
Arrange the screens to match your desk
The numbered boxes in the diagram represent your monitors. Drag them so their positions match where the physical screens sit on your desk - if the external monitor is to the right of your laptop, drag box 2 to the right of box 1, and align their top edges if the screens are at the same height. Get this wrong and your mouse "falls off" the wrong edge or jumps to the wrong screen. Click Apply (and Identify if you're unsure which box is which - it flashes a big number on each screen).
Pick your primary display
Your primary display is where the taskbar's clock, the Start menu and most new windows open. To set it, click the monitor you want as primary in the diagram, scroll to Multiple displays, and tick Make this my main display. Most people on a laptop-plus-big-monitor setup make the large external screen primary so it does the heavy lifting.
Scaling: fixing tiny or giant text
If text looks microscopic on a 4K monitor or oversized on a small one, that's scaling. Click the screen in the diagram, then under Scale & layout set the Scale percentage. Windows recommends a value (often 150% for a 4K 27-inch, 100% for a 1080p 24-inch); start there and adjust to taste. Each display can have its own scale - your sharp laptop panel and a larger external can each look right. A few older apps go blurry after a scale change until you sign out and back in; that's normal.
Resolution and refresh rate
Still under the selected display, set Display resolution to the monitor's native value (Windows flags it as "Recommended") - running below native makes everything soft. Then click Advanced display and set the refresh rate to the highest your monitor supports (60Hz, 120Hz, 144Hz and so on). A high-refresh monitor left at 60Hz is a common, invisible waste; this is where you switch it on.
Running the laptop closed (clamshell) on Windows
To use the laptop shut with only the external screen, choose Show only on 2 (or your external's number), then stop the lid sleeping it: open Control Panel > Hardware and Sound > Power Options > Choose what closing the lid does, and set "When I close the lid" to Do nothing while plugged in. Keep the laptop on power and make sure it has airflow.
7. Step 4 (macOS): the same job on a Mac
On a current Mac the flow is similar but the menus differ, and there's one hardware gotcha to flag. Connect the monitor, then open System Settings > Displays (Apple menu > System Settings on macOS Ventura and later; older versions call it System Preferences).
Extend or mirror
With the external display connected, the Displays pane shows each screen. macOS extends by default in most cases. If it's mirroring instead, find the Mirror Displays tick-box (shown when you click a display, or under a "Use as" option) and turn it off to extend. As on Windows, extend gives separate desktop space on each screen; mirror shows the same picture on both.
Arrange the displays
Open Arrange in the Displays pane. You'll see blue rectangles for each screen - drag them to match your physical layout, exactly as on Windows. The thin white bar atop one rectangle marks the screen with the menu bar; drag it to a different display to move your "main" screen there.
Resolution and scaling
Click a display and you'll see resolution options. macOS presents these as a row of preview sizes from "Larger Text" to "More Space" rather than raw pixel numbers - pick the one that gives comfortable text. For the exact native resolution, hold Option while clicking "Scaled" to reveal the full list. Set the Refresh Rate drop-down to the highest your monitor supports.
The Apple Silicon display limit - read this before you buy
This catches people out constantly, so be precise about your Mac. The base Apple Silicon chips have historically limited how many external screens you can attach:
- M1 and M2 (base) MacBook Air / 13-inch Pro: officially one external display only. You cannot natively run dual external monitors on these - you'd need a DisplayLink dock to add a second.
- M3 (base) MacBook Air: two external displays, but only with the laptop lid closed (clamshell). Open the lid and you're back to one external.
- M4 and newer (base): two external displays alongside the built-in screen, lid open - finally no clamshell requirement.
- Pro / Max chips: support more external displays natively; check your exact model on Apple's spec page.
If you have an M1 or M2 Air and want two external screens, that's not a settings problem you can fix - it's a hardware limit, and DisplayLink (with its caveats from section 5) is the only route. Knowing this before buying a second monitor saves a frustrating return.
Clamshell mode on a Mac
To run a MacBook closed with external monitors you need three things: the Mac on power (clamshell won't engage on battery), an external keyboard and mouse, and the displays set to extend, not mirror - mirroring blocks clamshell. Connect everything, then close the lid; the external screens take over, and a key-press on the external keyboard wakes it.
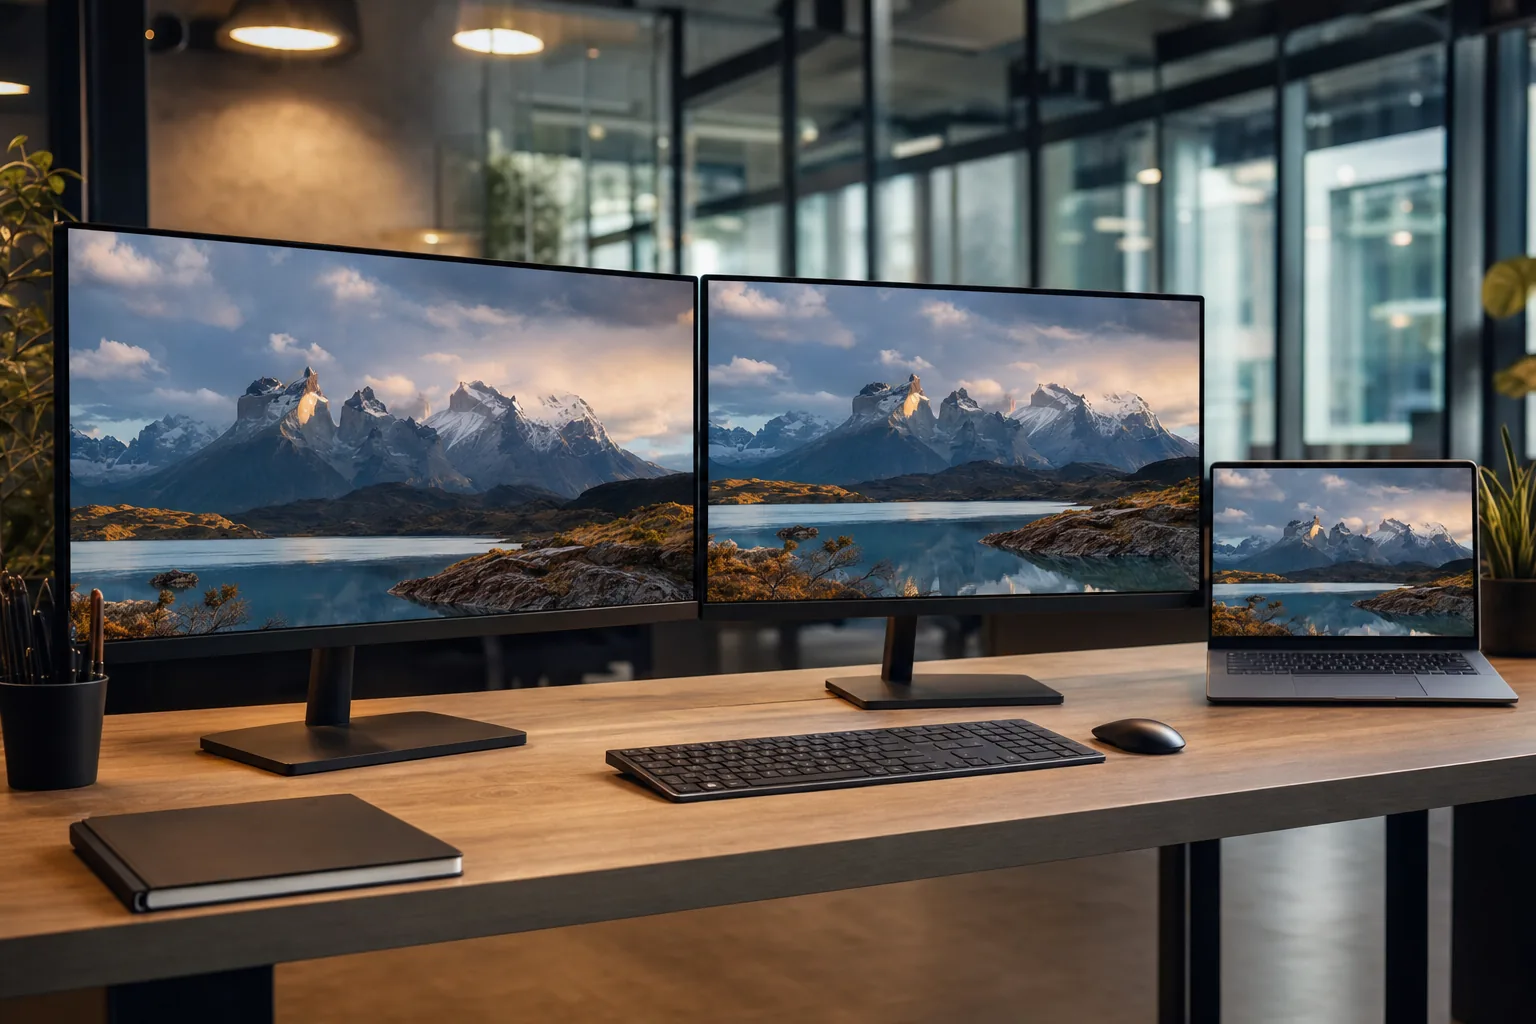
8. Going to three screens (and closed-lid setups)
Two screens are transformative; a third is a smaller, more specialist gain - useful if you live in chat, dashboards or reference material. The rules are the same, just multiplied, and the bottleneck is always the laptop's video capability rather than the monitors.
What it takes to drive three displays
- Laptop's built-in screen + two externals. The easiest "three screens" is your laptop panel plus two external monitors. On Windows this needs a laptop and dock with enough video bandwidth - typically a Thunderbolt machine and Thunderbolt dock, or a DisplayLink dock on a more limited laptop. On a Mac it needs an M4-or-newer base chip, a Pro/Max chip, or DisplayLink for the older ones.
- Closed laptop + three externals. Running the laptop shut and driving three external panels is firmly dock territory. Check the dock's spec for the exact number and resolution of displays it supports - "triple 4K" docks exist but need the bandwidth at the laptop end to deliver it.
A common, practical recipe on a single-display laptop is one monitor on the native USB-C/HDMI output and a second or third on a DisplayLink dock. This works well for productivity - just keep any protected streaming on the native output, since the DisplayLink screens can't show HDCP content.
Refresh-rate reality at three screens
Bandwidth is shared. Push three high-resolution, high-refresh panels off one cable and something gives - the dock may cap you at 4K/30 across all three, or 60Hz on two and 30Hz on the third. For office work this rarely matters; for anything motion-heavy, prioritise a native connection for the screen you care about most and accept lower specs on the rest.
9. Ergonomics: making it comfortable, not just bigger
A multi-monitor setup is wasted if it leaves you hunched and aching by mid-afternoon. The physical arrangement matters as much as the cables, and laptops make it harder because their screens sit low - the keyboard and display are joined, so a comfortable keyboard height puts the screen far too low. Fixing that is the single biggest comfort win.
Get the screens to eye level
The top of each monitor should sit at roughly eye level when you're sitting up straight, so your gaze falls slightly downward onto the middle of the screen. For a laptop, that almost always means a laptop stand paired with an external keyboard and mouse - or simply running the laptop closed and relying on the external monitor. A standalone monitor is usually height-adjustable; if not, a monitor arm or a couple of sturdy books under the base will do.
Position by how much you use each screen
- If both screens get equal use, place them side by side and centre yourself on the join, angled inward slightly to form a shallow arc so neither forces a big head turn.
- If one screen is your main and the other is secondary (reference, chat, monitoring), put the main one directly in front of you and the secondary to one side. This is the most common and most comfortable laptop arrangement.
- A laptop used as the second screen sits naturally lower; keep it for glanceable things (notifications, music, a chat window) rather than work you stare at for hours.
Distance, angle and light
Sit roughly an arm's length from each screen - further for larger panels - and tilt each one back slightly so it's perpendicular to your line of sight. Then sort the lighting: position screens so windows and bright lights are to the side, not behind you (silhouettes everything) or in front (reflections and glare). A monitor facing a window will have you squinting all day regardless of how good the panel is.
The five-minute comfort check
Sit normally and look straight ahead. Your eyes should land on the top third of your main screen without tilting your head, your wrists should be straight on the keyboard, and you shouldn't see a window reflected in the glass. If any of those is off, adjust before you settle in - small changes here prevent the neck and eye strain that creep up over weeks.
10. Troubleshooting: when a screen won't behave
Most dual-monitor problems trace back to the cable, the port or one display setting - a methodical check finds them fast.
Most dual-monitor problems come down to one of three things: the wrong or faulty cable/port, a display setting, or a driver. Work through these in order rather than guessing, and you'll find the cause quickly.
Second monitor not detected at all
- Check it's powered and on the right input. A monitor set to the wrong input (HDMI 1 when you're plugged into HDMI 2, or HDMI when you're on DisplayPort) shows "No Signal" exactly like a dead connection. Use the monitor's own buttons to cycle inputs.
- Try the other port on the laptop. As covered in section 2, not every USB-C port carries video. If one gives nothing, try another, and favour any Thunderbolt-marked port.
- Swap the cable. A charge-only USB-C cable or a failed HDMI lead is the most common single culprit. Test with a cable you know carries video.
- Force a detect. On Windows, open Settings > System > Display, scroll to Multiple displays and click Detect. On a Mac, open System Settings > Displays and hold Option to reveal a Detect Displays button.
- Check you haven't hit a hardware limit. If you're trying for a second external on an M1/M2 Mac or a single-display-only Windows laptop, no amount of detecting will help - see sections 5 and 7.
Wrong resolution or fuzzy text
If the picture is soft, the resolution is probably below native - set it to the recommended value (Windows: Display resolution; Mac: Option-click "Scaled" for the full list). If text is sharp but too small or large, that's scaling, not resolution - adjust the Scale percentage on Windows or pick a different size preset on macOS. A 4K screen stuck at a low resolution often means a cable or port that can't carry full 4K.
Monitor stuck at 30Hz or capped resolution
This is nearly always a bandwidth limit: an HDMI 1.4-era cable, a passive adapter that maxes at 4K/30, or a USB-C port carrying video plus other data. Use an HDMI 2.0+/DisplayPort 1.4+ cable, plug the screen into a more capable port, and remember a multi-monitor dock shares bandwidth across all outputs.
Flicker, black-outs or random disconnects
- Reseat the cable at both ends - a half-inserted USB-C or DisplayPort connector flickers intermittently.
- Shorten or upgrade the cable. Long passive cables at high bandwidth are a classic cause of flicker; drop to 1.5-2m or use an active cable.
- Lower the refresh rate one notch as a test. If 144Hz flickers but 120Hz is rock-solid, the cable or port is at its bandwidth limit.
- Update the graphics driver (Windows: via the laptop maker's support site or GPU vendor's app; Mac: via system updates). Update the DisplayLink Manager too if you're using a DisplayLink dock.
Mouse jumps to the wrong screen, or windows open on the dark one
That's the arrangement. In Display settings (Windows) or Arrange (Mac), drag the screen thumbnails so they match the real-world left-to-right (and height) positions of your monitors, and set the correct primary/main display. Once the diagram matches reality, the pointer flows naturally between screens.
Everything works, then breaks after sleep or undocking
Laptops sometimes "forget" the arrangement after sleep or when you re-dock. Usually a few seconds fixes it as the displays re-handshake; if not, unplug and replug the dock or monitor cable. Plugging the dock's power in first and the laptop cable last (section 5) makes this far more reliable, and Windows key + P > Extend snaps you back if it reverts to duplicate.
The one-minute diagnostic order
When something's wrong, check in this order: input source on the monitor → different cable → different port → Detect in display settings → driver/ DisplayLink update → hardware limit. Going top to bottom finds 95% of issues in a couple of minutes, and stops you buying parts you don't need.
11. A worked example: laptop + one big monitor in ten minutes
To pull it all together, here's the most common real-world setup done start to finish - a typical UK home office: an ultrabook with one video-capable USB-C port and a single 27-inch monitor.
- Identify the port (1 min). The laptop has two USB-C ports; one has a small DisplayPort "D" logo beside it. That's the one to use. The monitor has HDMI and a USB-C input.
- Choose the connection and cable (2 min). Both ends have USB-C and the monitor's USB-C does Power Delivery, so one USB-C-to-USB-C cable rated for video and charging carries the picture and powers the laptop. A cable listed for "USB4 / DisplayPort Alt Mode, 4K 60Hz, 100W PD" covers it with headroom - around £15-£25 for a good one.
- Plug in (1 min). Monitor on power and switched to its USB-C input; one cable from the laptop's marked USB-C port to the monitor. The picture appears within a few seconds.
- Set extend (1 min). Windows + P → Extend (or System Settings → Displays → turn off mirroring on a Mac).
- Arrange and set primary (2 min). Drag the screen thumbnails to match the monitor sitting above-and-behind the laptop; make the 27-inch the main display.
- Tune the picture (2 min). Set the monitor to its native resolution, refresh rate to its maximum (e.g. 75Hz or 100Hz), and scaling to the recommended value so text is comfortable.
- Run it closed (optional). Raise the laptop on a stand, or close the lid (set "do nothing on lid close" on Windows, or close it on a powered Mac with an external keyboard) and work from the big screen with the laptop tucked away.
That's a complete, comfortable single-monitor laptop setup in about ten minutes, with one cable to plug in each morning. Scaling to two monitors just means repeating the cable/port check and, if your laptop can't natively drive two screens, adding the right dock from section 5.
Frequently asked questions
Can any laptop run dual monitors?
Almost any laptop can run at least one external monitor, giving you a two-screen setup with the laptop's own panel. Running two or more external monitors varies by the laptop's video output: a Thunderbolt or capable USB-C port (often with a dock) can drive two, while entry-level laptops and older Apple Silicon Macs (M1/M2) natively support only one external screen and need a DisplayLink dock to add more.
Do I need a docking station for two monitors on a laptop?
Not always. For one external monitor, a single cable is enough. You need a dock when you want two or more external screens, want one-cable docking with charging, or have run out of ports. A Thunderbolt dock gives the best quality if your laptop has a Thunderbolt port; a DisplayLink dock adds extra screens to laptops that natively support only one, with trade-offs around streaming and software.
How do I tell if my laptop's USB-C port supports a monitor?
Look for a small DisplayPort "D" logo or a lightning-bolt Thunderbolt symbol next to the USB-C port - either means it carries video. A plain, unmarked USB-C port may be charge-and-data only. If the markings aren't clear, search your laptop's exact model number plus "DisplayPort Alt Mode" or "video out" on the manufacturer's spec page.
Why is my second monitor not being detected?
Work through it in order: check the monitor is on the correct input; try a different port on the laptop (not every USB-C port carries video); swap to a cable you know carries video; then click Detect in Windows display settings or Option-click Detect Displays on a Mac. If you're trying to add a second external screen to an M1/M2 Mac or a single-display laptop, it's a hardware limit, not a settings fix.
Should I extend or duplicate my displays?
Extend, for almost everyone. Extend treats the second screen as extra desktop space so you can have different windows on each - the whole point of a multi-monitor setup. Duplicate (mirror) shows the same picture on both and is only useful for presentations or showing someone your screen. On a laptop, mirroring also prevents closed-lid clamshell mode on a Mac.
Why does my 4K monitor only run at 30Hz?
That's a bandwidth limit somewhere in the chain. Common causes are an older HDMI cable (HDMI 1.4), a cheap passive adapter capped at 4K/30, or a USB-C port carrying video plus other data. Use an HDMI 2.0-or-better or DisplayPort 1.4-or-better cable, plug into a more capable (ideally Thunderbolt) port, and remember a multi-monitor dock shares bandwidth across all its outputs.
Can I use my laptop closed with an external monitor?
Yes - this is clamshell mode. On Windows, set "do nothing" when the lid closes (Power Options) and choose "Show only on 2". On a Mac, keep it on power, use an external keyboard and mouse, set the displays to extend (not mirror), then close the lid. Make sure the laptop has airflow, as a closed laptop working hard can run warm.
The bottom line
Setting up dual monitors on a laptop is far simpler than the tangle of cables and standards suggests, as long as you do the steps in order. The whole game is won or lost at step one: identify which of your laptop's ports actually carries video. Get that right and the rest is a cheap cable and five minutes in Settings to extend the desktop, arrange the screens and dial in the resolution and scaling. For most people in 2026, a single video-capable USB-C cable to a USB-C monitor is the cleanest setup there is - one lead that carries the picture, charges the laptop and connects your peripherals.
Reach for a dock only when you genuinely need more screens or ports, and go in knowing the difference: Thunderbolt and native USB-C docks give the best quality, while DisplayLink unlocks extra displays on limited laptops at the cost of a driver and, on Macs, protected streaming. Mind the Apple Silicon display limits before you buy a second monitor, get the screens to eye level, and keep the one-minute diagnostic order handy for when something misbehaves. Do that, and a second - or third - screen quietly becomes the best-value productivity upgrade you'll make all year.