How to Clean and Repaste an Old Laptop Yourself (Without Wrecking It)
A careful, friendly step-by-step for opening your laptop, clearing out years of dust and reapplying thermal paste — with the tools and paste actually worth buying.
 By Dan Coveney · Founder & Lead Reviewer · Updated July 04, 2026
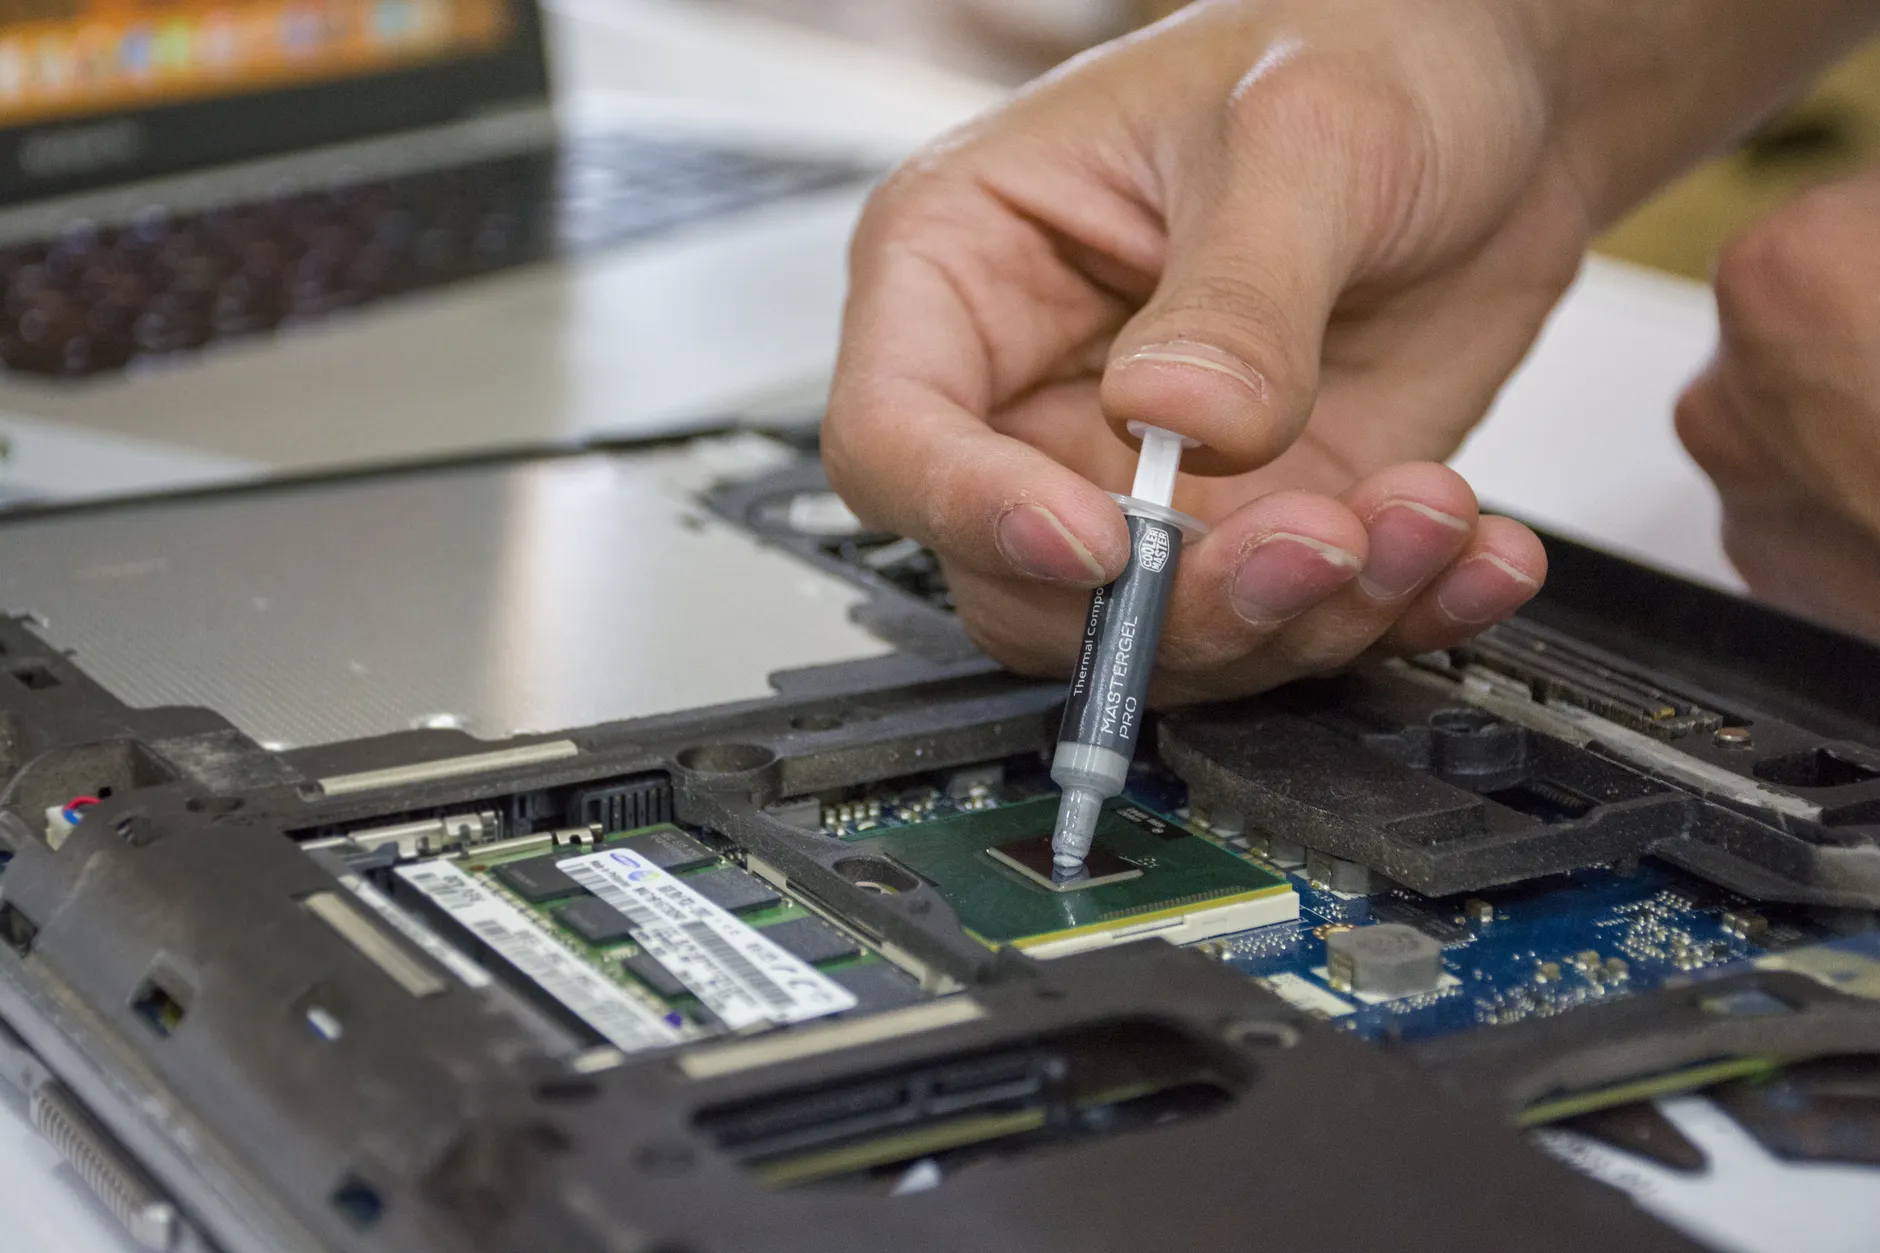
A tired old laptop, a tube of quality paste and a bit of patience — that's genuinely all it takes to feel years younger.
I want to be upfront from the start: this is a job that rewards patience far more than technical skill. You don't need to be an engineer. You need to be tidy, gentle, and willing to stop and think before you force anything. Do that, and you'll bring an old machine back from the brink for the cost of a decent takeaway. Rush it, prise at things blindly, or ignore static safety, and you can genuinely do damage. So we're going to take our time.
By the end you'll understand exactly why cooling degrades, what tools and paste are worth buying, how to open the thing without cracking clips, how to strip the old paste and apply the new stuff properly, and how to put it all back together and confirm you've actually fixed the problem. Let's get into it.
Why Cleaning and Repasting Actually Works
Before you touch a screwdriver, it helps to understand what's going on inside. Your CPU and GPU are essentially little squares of silicon that produce a lot of heat when they work hard. That heat has to travel somewhere, or the chip cooks itself. The path it takes is: die → thermal paste → heatsink → heat pipes → fan → out of the vents. Every link in that chain matters, and two of them degrade with age.
Thermal paste is the unsung hero here. It acts as a heat conductor between the CPU or GPU die and the heatsink sitting on top of it. No two metal surfaces are ever perfectly flat — under a microscope, both the die and the base of the heatsink are covered in tiny pits and ridges. Thermal paste fills those microscopic imperfections so heat can flow efficiently across the join. Without it, those gaps fill with air, and air is a superb insulator. Instead of conducting heat away, those trapped air pockets hold it against the processor like a duvet.
Modern laptops make this worse by design. Manufacturers keep cramming more powerful components into ever-thinner chassis, which leaves less room for airflow and less margin for error in the cooling system. When that system is running at its best it just about copes. When it degrades, everything falls apart quickly.
Dust builds up where it hurts most
Over months and years, dust accumulates in the fan fins and heatsink channels — exactly the spots that need to move air. A computer choked with dust runs hotter and, as a direct result, feels slower.
Thermal paste dries out over time
The paste that was creamy and conductive on day one gradually dries, cracks and loses its ability to bridge that die-to-heatsink gap. Both problems hinder heat dissipation — and they usually strike together.
Thermal throttling is the visible symptom
When cooling can't keep up, the CPU and GPU deliberately reduce their clock speeds to avoid overheating. That's throttling, and you feel it as stuttering, slow app loading and dropped frame rates in games.
Sustained heat shortens component life
Beyond the day-to-day sluggishness, prolonged high temperatures genuinely shorten the lifespan of your components. Fixing the cooling isn't just about speed — it's about longevity.
Here's the part I love: the fix costs a fraction of a replacement. Refurbishing an old laptop typically costs 30–70% less than buying a new one, and it keeps a perfectly serviceable machine out of the e-waste stream, cutting your carbon footprint in the process. If your day-to-day is browsing, documents and video, a clean-and-repaste can make an ageing laptop feel entirely adequate again. Where cost and sustainability matter and your performance demands are moderate, it's a genuinely smart move rather than a compromise.
One caveat worth saying plainly: if you reassemble the laptop and forget to reapply paste, the processor will overheat — and that can cause permanent damage. Thermal paste isn't optional. It's an essential part of the device.
The Tools and Paste Worth Buying
You can absolutely do this on the cheap, but a couple of small purchases make the whole job faster, safer and far less stressful. Here's what I'd have on the bench before I started, and why each thing earns its place.
A precision screwdriver set, a spudger, isopropyl alcohol and a tube of decent paste — the core kit that turns this from a gamble into a Sunday-afternoon job.
The essentials for a paste job
Let me expand on the ones that matter most. A small Phillips head screwdriver is non-negotiable — laptop screws are tiny, and a precision screwdriver set is well worth having so you're never rounding off a stubborn fastener. A spudger is a non-conductive prying tool for popping plastic latches and separating case halves without marring the finish; a butter knife or flathead screwdriver will scratch and slip, so don't. Anti-static tweezers let you manipulate small connectors and delicate ribbon cables without fumbling them.
The anti-static wrist strap is the one people love to skip, and the one I'd most insist on. It prevents electrostatic discharge — that invisible little zap that can quietly kill sensitive components without you even feeling it. A few pounds of insurance against bricking your motherboard is money well spent.
For cleaning, a compressed air can blasts dust out of fan fins and heatsink channels, isopropyl alcohol at 90% or higher dissolves old paste cleanly and evaporates without leaving residue, and lint-free cloths or coffee filters plus a few cotton swabs handle the wiping and the tight corners. Finally, grab a magnetic mat or a set of small containers so you can lay out screws in the order and location you removed them — this single habit prevents the most common reassembly headache going.
Pro Tip
90%+ isopropyl alcohol is the sweet spot for removing old paste. Lower-concentration bottles contain more water, which evaporates more slowly and can leave a film. If all you can find is 70% it'll do in a pinch for general board cleaning, but for the die and heatsink surfaces, hold out for the strong stuff.
Which thermal paste should you buy?
This is where people overthink things. For a laptop you do not need to chase the last half-degree with exotic liquid metal — you need a reliable, well-behaved, non-conductive paste from a brand with a track record. Three names come up again and again for good reason, and I'd happily use any of them.
Arctic MX-4

See Arctic MX-4 on Amazon UK
£5.49 · 35% offprice at 5 Jul, may change
The sensible default. Arctic MX-4 is easy to spread, non-conductive, forgiving of a slightly imperfect application, and lasts for years. If you've never done this before, it's the paste I'd point you to first — it's hard to get a bad result with it.
Noctua NT-H1

See Noctua NT-H1 on Amazon UK
£9.95price at 5 Jul, may change
Noctua's NT-H1 is another beautifully consistent, non-conductive paste with a reputation built on the brand's obsessive cooling engineering. It applies smoothly, doesn't run, and performs reliably over a long service life — a lovely choice for a laptop that runs warm.
Thermal Grizzly Kryonaut
If you want the enthusiast pick, Thermal Grizzly Kryonaut is a high-performance paste favoured by people chasing every degree of headroom, including in warm-running gaming machines. It's a touch thicker to work with, but the thermal performance is excellent.
Whatever you pick, avoid generic or unknown-brand pastes. Their performance can be wildly inconsistent, and given the whole point of this exercise is better cooling, saving a pound or two on the one component that actually does the heat transfer is a false economy.
Safety First: Static, Power and Patience
Two things kill laptops during DIY repairs, and neither is difficult to avoid. The first is electrostatic discharge; the second is impatience. Sort both and you're most of the way to a clean job.
Before you disassemble anything, follow general ESD safety procedures. Clip your anti-static wrist strap to bare metal and keep it on throughout — not just for the scary bits. Work on a hard, non-carpeted surface. Avoid doing this in socks on a fluffy rug in dry winter air, which is basically a static-generating machine.
Habits that keep you safe
- Wear the anti-static wrist strap the entire time
- Power off completely and unplug before opening
- Lay screws out by location on a magnetic mat
- Photograph each stage before you disconnect cables
- Stop and re-check the moment anything resists
Mistakes that wreck laptops
- Prising blindly at clips with a metal blade
- Forcing a cover that's still held by a hidden screw
- Skipping the paste on reassembly
- Yanking ribbon cables instead of releasing the latch
- Working on carpet with no static protection
The golden rule
If something won't move, it's held by something you haven't undone yet. Nothing inside a laptop should require real force. When you feel resistance, stop, look for the screw or clip you've missed, and only then continue. This one habit prevents almost every cracked case and snapped cable I've ever seen.
Step 1: Power Down and Prepare
Start clean. Completely power off the laptop — a full shutdown, not sleep or hibernate — and unplug it from the mains. If your machine has a removable battery, take it out now; if it's internal, you'll disconnect it later once you're inside. Close the display and flip the entire laptop upside-down on your work surface so the underside faces you.
Take a moment here to just look at the base. Note where the screws are, whether there are rubber feet, and whether there's an obvious service panel or whether the whole bottom cover comes off as one piece. Every laptop is different, and a minute of looking now saves ten minutes of frustration later. If you can find a teardown or service manual for your exact model, have it open on your phone.
Flip it, look before you leap, and keep a labelled tray ready for every screw you remove.
Step 2: Find the Hidden Screws
Here's the trap that catches beginners: you undo every screw you can see, and the cover still won't budge. That's because plenty of laptops hide screws underneath the rubber feet. Manufacturers do this for a cleaner look, and it's a rite of passage to discover it the hard way.
Use the tip of a spudger or an opening pick to gently lift the rubber feet. If a foot is stuck fast with adhesive, don't tear at it — lightly warm it with a hair dryer (or an iOpener if you have one) to soften the glue underneath, then it'll peel away cleanly and re-stick later. Keep those feet somewhere safe; you'll want them back on at the end so the laptop doesn't slide around and vents properly.
Feet aren't the only hiding spot. Some models tuck screws under warranty stickers or behind the display hinges. If the cover still resists after you've cleared the feet, keep looking rather than levering harder.
Step 3: Remove the Back Cover
With every visible and hidden screw removed, you can take off the back cover. Use your screwdriver to undo the screws securing it, keeping them organised by position — the mat or containers earn their keep here, because screws around a laptop base often come in different lengths, and putting a long screw into a short hole can pierce something it shouldn't.
Fastener types vary enormously by model, so match your bit properly and don't cam out the heads. Once the screws are out, the cover is usually still held by plastic clips around the perimeter. This is spudger territory. Slide the flat end of the spudger into the seam and gently work your way around, releasing clips one at a time. You'll hear little clicks. Work patiently rather than trying to pop the whole lid at once, and the cover will lift away without a single crack or scratch.
Pro Tip
As soon as the cover is off and you can reach it, disconnect the battery connector before you touch anything else. Working on a live board risks shorts. Ease the connector straight up with your spudger — never by tugging its wires.
Step 4: Clear Out the Dust
Now for the satisfying bit. With the internals exposed, you'll almost certainly see felt-like mats of dust packed into the fan and jammed against the heatsink fins. This is the stuff that's been making your laptop run hot and feel slow, and clearing it out often delivers a noticeable improvement on its own.
Reach for the compressed air. Give short, controlled bursts to blow dust from the fan fins and out of the heatsink channels. A crucial detail: hold the fan blades still with a finger or a cotton swab while you blow. If you let the air spin the fan freely at high speed, you can generate a voltage that damages the fan or connected components — so pin it, then blast.
The fan
Pin the blades, then blow dust out from the intake side. Use cotton swabs to lift any stubborn dust bunnies wedged between the blades and the housing.
The heatsink fins
This is where a solid wall of dust usually hides, right where the fan pushes air out through the vent. Blow it clear and you'll often see daylight through the fins for the first time in years.
Ports and crevices
Cotton swabs are ideal for cleaning intricate, tight areas — around ports, connectors and the awkward corners compressed air alone won't fully clear.
Take your time and be thorough. The whole reason you've opened the machine is cooling, and a heatsink that can finally breathe is doing half the job for you before you've even touched the paste.
Step 5: Remove the Old Thermal Paste
To repaste, you'll need to lift the heatsink assembly off the CPU and GPU. These are usually held by a few spring-loaded screws, often numbered. Undo them in the order marked (or in a diagonal, crisscross pattern if they're not numbered) and only a little at a time, so the pressure releases evenly rather than putting a lopsided strain on the die. Gently lift the heatsink away — if it feels glued down by old, dried paste, a tiny bit of side-to-side wiggle usually frees it.
You'll now see the old paste on both the chip die and the underside of the heatsink where it contacts each chip. It'll likely be dry, discoloured and possibly cracked — exactly the state that's been strangling your cooling. Time to strip it off completely.
Dampen a lint-free cloth or coffee filter with your 90%+ isopropyl alcohol and wipe the old paste away. Work gently and patiently, refreshing to a clean section of cloth as you go. For the stubborn residue in the corners of the die or around its edges, a cotton swab dipped in isopropyl does the fiddly work. Keep going until both the die and the heatsink contact patches are spotlessly clean, dry and free of any smear. Let the alcohol flash off fully — it evaporates in seconds — before you apply anything new.
Don't scrape at the die with anything metal or abrasive. Alcohol and gentle wiping dissolve the old paste perfectly well; you never need to force it. A clean, undamaged surface is the whole goal.
Step 6: Apply the New Paste Properly
The single biggest mistake here is using far too much paste. Only a small amount is needed per component. The paste exists to fill microscopic gaps, not to build a sandwich — a thin, even layer conducts heat; a great blob just insulates and oozes out over the surrounding board when the heatsink clamps down.
Less is more: a small, rice-grain-to-pea-sized dot per chip is all you need. The heatsink's pressure does the spreading.
For a typical laptop CPU or GPU die, place a small dot of paste — think a grain of rice up to a small pea, depending on die size — in the centre of the chip. When you seat the heatsink and tighten it down, that dot spreads evenly outward under pressure to cover the die. If you prefer, you can spread a thin, even layer manually with a clean tool, but the central-dot method is reliable and reduces the risk of trapping air bubbles. Whichever you choose, keep it modest and keep it clean.
Pro Tip
If your laptop has both a CPU and a discrete GPU under the same heatsink, remember to paste both dies. It's easy to focus on the CPU and forget the GPU sitting right beside it — and a forgotten GPU will overheat just as surely.
Step 7: Reassemble Carefully
Reassembly is disassembly in reverse, and this is where your photos and organised screws pay off. Lower the heatsink squarely back onto the dies — don't slide it around once it touches the paste, or you'll smear it unevenly. Start the spring-loaded screws by hand, then tighten them a little at a time in the numbered or crisscross order, so the heatsink seats flat and applies even pressure across every chip.
Reconnect anything you unplugged, including the battery connector, pressing connectors home gently until they click. Refit the back cover by lining up its clips and pressing around the edge until they seat, then drive in every screw — remembering which length goes where. Finally, press the rubber feet back into place (their adhesive usually re-grips; a dab of warmth helps if it's gone tacky).
Do a quick "leftover screw" check before you flip it back over. If you've got a spare screw on the mat and no empty hole, don't power on — go back and find where it belongs. A loose screw rattling around inside is a genuine short-circuit risk.
Step 8: Test and Confirm the Fix
Power it back on and let it boot normally. Listen to the fan — it should spin up and settle down rather than roaring constantly. Then install a temperature-monitoring utility and watch your CPU and GPU temperatures both at idle and under load. Run something demanding for a few minutes and see whether temperatures stay in a sensible range and, crucially, whether the machine holds its clock speeds instead of throttling back.
The proof is in how it feels. If the stuttering, slow app launches and dropped frame rates you were seeing have eased, you've successfully broken the overheating cycle. Give the paste a few power cycles to fully settle — it's normal for temperatures to improve slightly over the first day or two of use.
Illustrative relative heat load — the exact figures depend on your machine, but the direction of travel is consistent: dust out and fresh paste in means lower temperatures and steadier clocks.
DIY vs Paying a Shop vs Buying New
It's worth being honest about your options, because DIY isn't always the right call for everyone. Here's how the three routes stack up.
| Consideration | DIY clean & repaste | Repair shop | Buy new laptop |
|---|---|---|---|
| Cost | Cost of tools + paste only | Labour on top of parts | Full retail price |
| Cost vs new | Cheapest by far | Still typically 30–70% less than new | Baseline (most expensive) |
| Environmental impact | Lowest — extends the machine's life | Low — keeps hardware in use | Highest — adds e-waste |
| Skill required | Patience & care, not expertise | None (they do it) | None |
| Risk | You own any mistakes | Handled by a professional | None to your old machine |
| Best when | Tasks are basic, you're happy to learn | You'd rather not open it yourself | You genuinely need more performance |
For basic use — browsing, document editing, video — a clean-and-repaste is the standout value option where cost and sustainability matter and your performance demands are moderate. If you're nervous about opening the case, there's no shame in paying a shop; it still beats buying new on both cost and carbon. And if you honestly need substantially more power than the machine ever had, no amount of paste will conjure it, and a new laptop is the right answer.
Who Should Do This Themselves?
The overheating everyday user
If your laptop handles basic tasks but runs hot, throttles and feels sluggish, you're the ideal candidate. This is exactly the problem a clean-and-repaste solves.
The sustainability-minded
Keen to reduce e-waste and your carbon footprint? Reviving a working laptop for a few pounds is one of the most satisfying green wins in tech.
The budget-conscious
With refurbishing coming in 30–70% cheaper than a new machine, this is the frugal choice — provided your needs are moderate.
The genuinely careful
You don't need to be technical, but you do need to be patient and gentle. If "measure twice, cut once" is your instinct, you'll do great.
Frequently Asked Questions
The Verdict
Cleaning and repasting an old laptop is, hands down, one of the highest-value bits of DIY in tech. For the cost of a decent thermal paste, some isopropyl alcohol and a handful of cheap tools, you can undo years of dust build-up and dried-out paste — the two things quietly cooking your processor and forcing it to throttle. The result is a machine that runs cooler, holds its clock speeds, feels noticeably snappier and lasts longer.
Reassembled, dust-free and repasted — a laptop that's genuinely earned another few years of service.
The skill barrier is low; the patience barrier is what matters. Power down fully, wear that anti-static strap, hunt down the hidden screws, never force anything, clean the fan and heatsink thoroughly, strip the old paste back to bare metal, and apply just a small, clean dot of quality paste. Do that, and you'll come away with a cooler, quicker laptop — and the quiet satisfaction of having saved money, cut waste and fixed it yourself rather than binning a perfectly good machine.
If you're on the fence, my honest advice is to try it. Start with the dust clean, which is low-risk and already helps, and once you've built confidence the repaste is the natural next step. Take your time, and your old laptop will thank you for years to come.